We have heard that Amazon is the largest e-commerce industry at this time.
For the betterment of buyers as well as sellers, those who sell their products through Amazon.
Amazon introduced many features; one of them is its storefront.
As an Amazon seller, do you want more buyers on Amazon?
And do you want to create a mini-website on Amazon? Then an Amazon storefront is a good option. But here the question arises “how to create an Amazon storefront?”
In this blog, we are going to discuss all the aspects of storefronts that can actually drive more sales, increase your order value, and also literally get you a website on Amazon.
Contents
- 1 What is an Amazon storefront?
- 2 How does the Amazon storefront work?
- 3 How to create an Amazon storefront
- 4 How to optimize your Amazon storefront
- 5 Conclusion
What is an Amazon storefront?
Many of us have heard of Amazon storefronts, but many do not know what Amazon storefront is.
So before creating an Amazon storefront, we need to know about all aspects of it.
An Amazon storefront Is a small website that you can create on Amazon where you can showcase and display the entire range of products in your Amazon catalogue.
How does the Amazon storefront work?
We know that the Amazon storefront is a mini-website.
So understand what happens on the website: when someone visits your storefront, all the products are only yours.
And the only competition here is your one product versus another product. No other competition exists. That’s exactly how the Amazon Storefront works.
Customers who come to your storefront only see your products.
As an example, we can understand how it works. If customers want to buy an individual product, and visit your storefront.
But when they go to your storefront, they see that there are other products of this brand, so instead of buying one product, they usually buy more.
Because now they can see your full catalog.
The good part is that there is no competition, there are no ads running on your storefront, and literally, it’s like free traffic; people have a higher recall value.
Customers can follow you, and when they want to buy some products, they can visit your storefront and buy them from there.
Now, in order to create a storefront on Amazon, you just need to have a trademark and brand registry done with Amazon.
Below, I’m going to show you and explain every single aspect of a storefront step by step and how you can actually get more and more sales with less and less competition from your genuine followers using the storefront.
How to create an Amazon storefront
Here I’m going to explain “how to create an Amazon storefront” step by step:
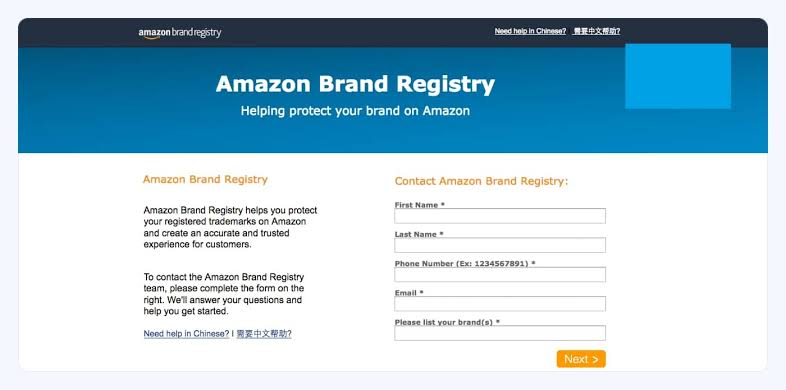
Step 1: Enroll in the brand registry program on Amazon.
To start an Amazon storefront, you first need to be part of the Amazon brand registry program.
This program helps protect your brand and product from being copied on Amazon.
It offers tools to search for knockoff products, and Amazon actively keeps an eye out for copies of your items.
To apply for the Amazon brand registry, you need a registered trademark.
Amazon accepts trademark from the world intellectual property organisation and specific countries, including USA, Brazil, Canada etc.
Steps to Apply for the Amazon Brand Registry Program
1. First, you have to sign in to your Amazon Seller Central account.
2. Name your brand with an active registered trademark.
3. Share your official or government-registered trademark number.
4. List the product categories related to your brand.
5. Specify the countries where your brand products are manufactured and distributed.
6. Submit your application.
After the submission of your application, Amazon will have a thorough review and contact the owner of the registered trademark for some formalities.
Then if your brand meets the said requisites for the Amazon Brand Registry Program, you receive a verification code for Brand Registry.
Which you have to use to officially enroll in the Amazon brand registry program.
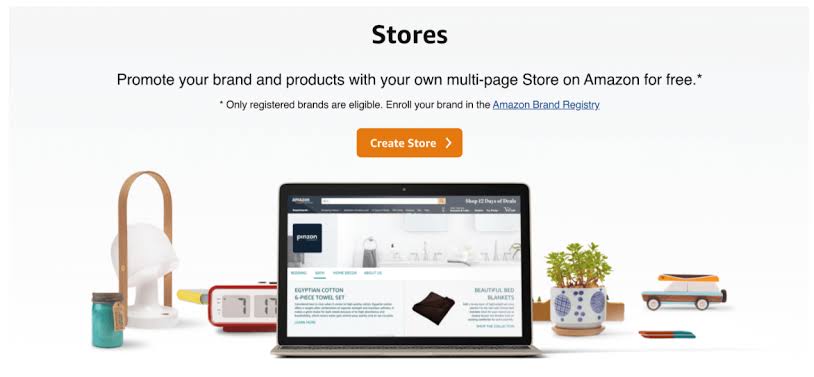
Step 2: Create your Amazon store.
After enrolling in the Amazon brand registry program now it’s time to open your own store on Amazon.
First, go to your Amazon “Seller Central” account and log in on the main navigation bar, then find and click on the storefront.
On the next page, choose the “create store” option, and a box will pop up.
Pick your brand’s name from the list. After choosing your brand, click on “Create store.”
Step 3: Add your brand name and logo.
Now Amazon will take you to its store builder. Before moving forward, Amazon needs some basic information about brand display names.
Now choose a name that represents your brand. This name will appear in your store, so make sure it’s something customers will recognize.
Next is the brand logo. Upload an image of your brand logo; it should be at least 400×400 pixels.
Step 4: Building your Amazon store.
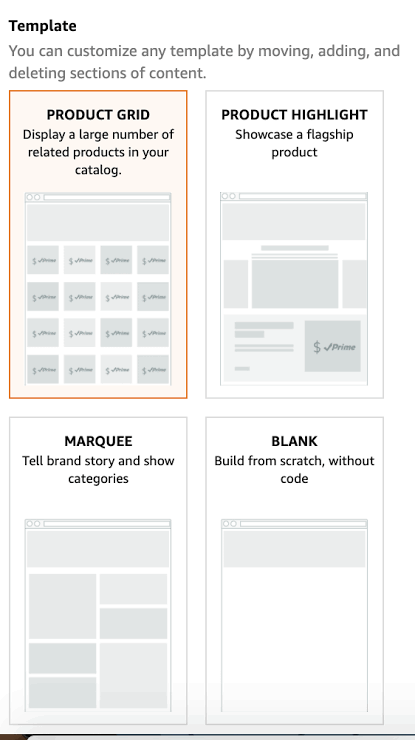
In this step, you will have to select a layout for the homepage. Amazon also offers pre-designed templates for the ease and convenience of the process.
These templates work similarly to website builders in ways that allow to customize the Amazon store using a similar drag-and-drop interface( no coding or development experience required) to create a storefront.
But, the point to note here is that some coding skills will be definitely helpful if gained.
The homepage layout options include Marquee, highlighting several products using your brand having larger images.
Next, is product highlight, which focuses on the bestselling products with a bold image or video.
Next, is the product grid/collection, showcasing all the catalog items.
Amazon also provides a blank design for businesses with a web design team.
Before choosing a homepage design you’ll need to add a page meta description.
Keep the description concise and simple. Be it as the tagline or to summarize the business, products, and the ways that benefit the seller on Amazon.
Once ready and “all set” select the suitable template and click on the “save” button.
Step 5: Customize your Amazon store design.
Next, it’s time to personalize your Amazon store.
Amazon’s drag-and-drop storefront builder makes it easy to tailor your store to your Amazon brand.
Now, upon entering the builder, you’ll see a series of styles; their arrangement depends on the design you have selected.
Then click on these styles to customize them with the product text, videos, or images.
If you add a text style, you can bold, italicize, and align your text. You can also include links within these styles directing customers to a product or a page on your store, such as the product category.
Step 6: Add your products.
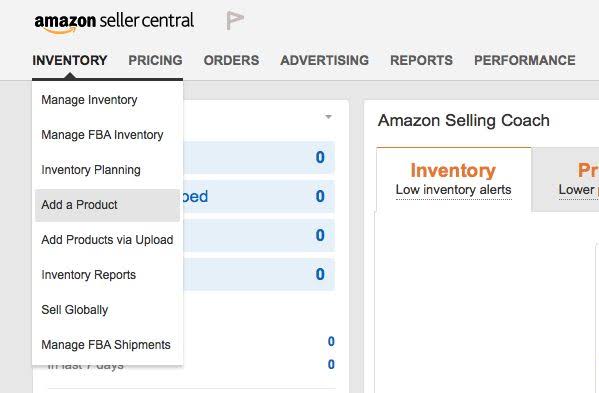
You must upload the products to your Amazon seller account before you can add them to your store.
The products can be added one at a time or in bulk. You should upload the products in bulk for a faster experience.
To add products to your Amazon Seller Central account, first log in, choose Inventory from the menu, then click “add a product” to add a single product, or upload several products to add them all at once.
You can add your product listings to your Amazon store once you’ve generated them.
Navigate to your active Amazon store, select a tile, and use the keyword or ease-of-use product search options to find your product.
To include the chosen product in the type, click Add. It undoubtedly aids clients.
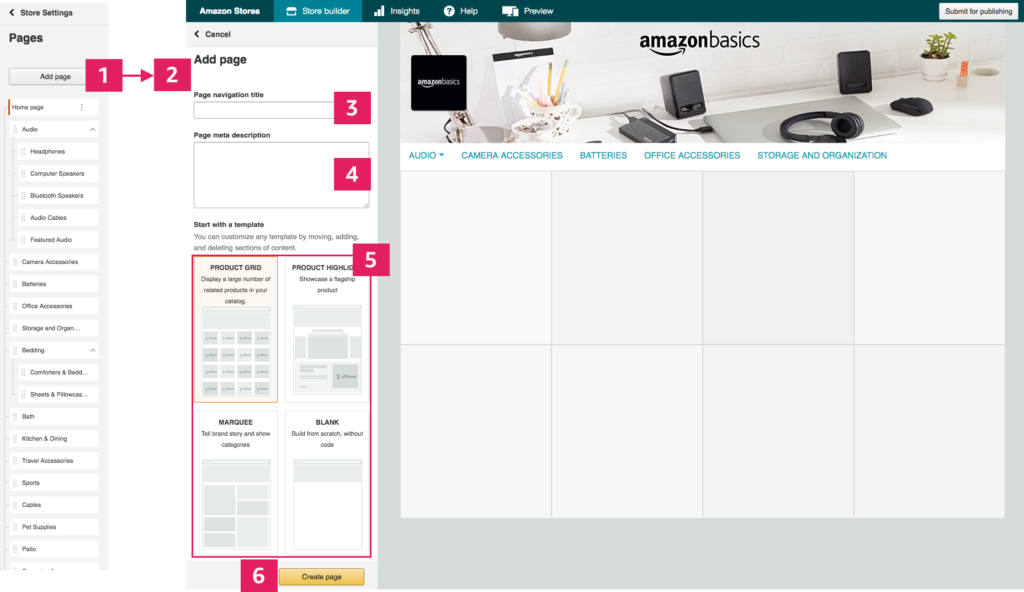
Step 7: Expand your store with pages.
Adding pages to your Amazon store can definitely help customers navigate your stores easily.
With straightforward navigation customers can find the products they need increasing the likelihood of placing an order therefore, adding pages is worthwhile if you have a large product catalogue.
To add a page to your Amazon store click add page from the left-hand menu in the store builder main menu.
Add a navigation title for your page this will appear on your stores’ navigation bar.
Enter a meta description for your page this should describe what your page is all about. Select a suitable page template.
Before making your page public, preview it to ensure everything looks and functions as intended.
To preview Click “Preview” from the navigation bar which is located above the store builder, to see how your store will look on Amazon.
After you have finalized your Amazon store now the time to launch it, select “submit” for publishing from the navigation bar.
Then Amazon will review and approve your Amazon storefront within 72 hours.
How to optimize your Amazon storefront
You know “how to create an Amazon storefront”. It is just the first step; optimizing it for conversions and profitability is crucial.
So here are some key points to enhance your storefront.
Target customer pain points.
Customers often visit your storefront without a proper idea of what they are looking for.
So guide them towards the best solution by designing your store around their specific needs and pain points.
By understanding your customer’s problems, you can effectively guide them in their purchasing decisions.
Tell your brand story.
Your storefront serves as more than just a product showcase. It’s an opportunity to connect with the consumer on a deeper level.
Share your brand story throughout the storefront. Highlighting your origins, motivations, and unique selling points.
Always remember that consumers are driven by emotions, and they look for reasons to connect with brands.
Use your content to foster brand loyalty and encourage purchases.
Leverage Amazon ads for enhanced sales.
Amazon ads provide a powerful tool to boost product visibility and drive sales.
And with this advanced ad platform, anyone can create ads on Amazon.
However, the effectiveness of these ads depends on their optimization strategies.
Track performance with brand analytics.
After your storefront is approved, you can start using brand analytics to measure its performance.
This comprehensive analytics tool, provided free by Amazon, is more accurate than third-party tools and provides insight into the top keywords and search terms used by consumers and competitors.
Utilize high-quality images.
Images are crucial for your Amazon storefront. So avoid using low-quality pictures; ensure all images are subject to Amazon’s restrictions and size guidelines.
Optimize for mobile.
Amazon’s website might not be mobile-responsive, so it’s advisable to preview your store on various mobile devices and laptops.
To check for overlapping images and copy, ensuring everything functions smoothly.
Leverage the Q&A section.
Amazon offers an underutilized Q&A section. Don’t be one of those brands neglected.
The Q&A section is a great way to demonstrate your commitment to customer service and showcase your product expertise.
A series of informative answers can significantly enhance the conversation and address any concerns that may be holding the customers back.
Conclusion
By understanding this blog we have an idea that Amazon has made easy way to make a store that boost your brand recognition.
A Amazon store also help customers to know about several brands. If any brand give good quality product, then the product can grow quickly.
Because of high traffic in the brand’s storefront.
As we get an idea of “How to Create an Amazon Storefront”, by this blog , it can help many people to create their own website where they showcase their brand.